Camper Remodel: Painting Cabinets

Progress continues with the camper. This week we took the first step in replacing the floor that we had to take out due to severe rotting :(


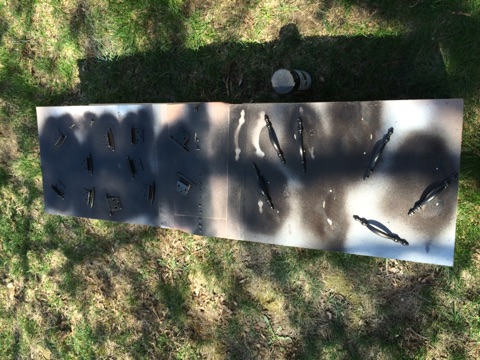
While Peter was doing that, I got busy removing the cabinets, priming, and painting. I used the oil-based Zinsser primer, which I brushed on initially. After doing several of the cabinet pieces, I ended up buying the spray paint version which went on a million times faster.  I am interested and hopeful with how it will hold up on those lovely laminate cabinets!
(My station all set up as I primed)

I found a really nice shade of white/off white, which is White Dove by Benjamin Moore. This is the shade I am using on the cabinets, although I don't have pictures yet of them all finished with that shade. 

Finally, I laid out all of the hardware and primed and spray painted it with a nice oil-rubbed bronze.
Above is what the rusty/off colored brass handles looked like before spraying! 

Camper Remodel: Cleaning the Tent Ends

It is finally warm out in Illinois! We drove to my hometown for the weekend where we have the camper stored. My big task was to clean the grimy/moldy tent ends. Peter came in with no plan but ended up demolishing the floor (long story for another day). 

This is what we started with:

A few weeks ago we attempted to clean the canvas, and bought two different products. One was a mold cleaner from Lowes, and the other was a 3M mold/mildew boat cleaner from Gander Mountain. We had luck cleaning the outside canvas, but the inside was not budging at all. 

I read a bunch of reviews and decided to order two of the Bass Pro Shop Mildew Stain Remover sprays. This was the best decision ever.

We decided it would be easiest to take off the tent ends so I could spread them out and clean them outside. It was a bright warm sunny day which I think actually helped activate the bleach a bit (I could be totally wrong there).  We used the spray, a soft bristled brush, a sponge, and a bucket of water. 

The technique I used was to spray and let it sit for 1-2 minutes, then I dipped the brush in water and scrubbed the canvas, which created some suds, but definitely showed that the tent was getting clean. Afterward, I used a wet sponge to wipe down the fabric. I'm not sure if the sponge totally cleaned out all of the spray product, but it smelled clean and bleach-like, and I'm ok with some of that being left over in the fabric.
My patch test revealed that the spray worked awesomely. 
Below is a good picture showing how clean it makes the fabric (left) versus the side I hadn't sprayed or scrubbed (right).
(The final clean product. So pleased! It looks new!)

And now for a few pictures of my handsome boyfriend working on the inside with the camper airing out! 

Our little camper

Every summer, Peter's family goes to Salisbury Beach, MA on the New England Seacoast for a week of camping. Peter's parents and siblings (and their families) all have campers that they stay in, and it is a ton of fun to hang out and relax.

A few weeks ago, Peter and I bought a 1999 Forest River Shamrock camper.  The camper is 19 feet long and is a "hybrid," which means it has bunks that pop out like a pop up camper.
The camper is in working order, but we got it for a cheap price and therefore have a few fixes that we will need to make, including some cleaning, water damage, and decorating.  I hope to document this process on the blog. You can check the link bar at the top of the page for more posts about the camper.

House goals 2015: Master Bedroom

My bedroom has seen some serious improvement since the day we got the place.

We repaired the plaster, removed the carpet, and sanded the floors.

Then, I moved all of my bedroom stuff into the room. I got bamboo blinds, a headboard, and some other random items. The room is kind of crowded with furniture I don't want in there (hint: the Ikea shelving unit next to my bed) because my closet/dressing room is still under construction.
(This was literally right after I moved my stuff in)

The room is slowly starting to come together.
I purchased a black bordered hotel-style duvet cover from Gilt, which I really like. I'm not crazy about those teal pillow from Pier1 that are currently on the bed. I've had them for years and used them in various places. They are super comfortable, but I don't want things matchy-matchy in this room. I'm not sure what will go in their place yet though. I do love the new faux fur mink throw that I picked up at Pier1 yesterday on sale (available here). 

The bamboo shades and bamboo storage baskets are making the room look a bit too "natural" for me, which is not quite my taste. I plan to white-wash those shades for a brighter look. I also want to get some light curtains hung once I can decide on what kind I'd like. 

Also on my list for 2015 is to paint the bedroom furniture either black or white, change out the hardware (if painted black), and add a nightstand and matching white lamps on either side. I also want to hang art.

My raised Jenny Lind bed: A year later

A year ago, I wrote about finding an antique Jenny Lind bed and raising the headboard to a more standard headboard height of about 52 inches. The bed has been finished and in my house for over nine months.. I think it's about time to post a few pictures!

The bed turned out great and has held up exceedingly well. I am currently using it in my guest room, which is not quite decorated at the moment, but definitely serves its purpose.  


If you recall, this is how the headboard previously looked. It was too short to use a box spring, and it needed a bit of TLC.

Here is how the headboard looked during the refinishing process:


And this is it now. 

Knobs and ends

My Ikea Hemnes furniture came with plain and standard knobs. I don't hate them but I also was not crazy about them.
So, I picked up some crystal knobs on sale at Anthropologie and swapped them out. They are on the bigger side and I am still trying to see if I like them. 


I also got some colorful knobs from Anthropologie to add to the armoire in my entryway and I really like how it looks.
I set my Lulie Wallace prints on top and it seemed to give the space some life! (P.S. I am obsessed with her art. Loveeee it).

It is nice having a few rooms in the downstairs almost done so I can just work on styling and decorating as time permits.

There are still two rooms upstairs that need complete gut jobs... and the kitchen isn't looking too hot either. Hope to get a move on with those soon!

Dressed up walls

I finally made the trip to Ikea to get some curtains and curtain rods. (Side note: NEVER go to Ikea on a Saturday if you can avoid it. Seriously. Ugh.) Anyway, I purchased the Ritva curtains at 118" length. They were $34 per pair, very reasonable! I have nine foot ceilings and wanted to be able to hang my curtains high, so the 98" ones ($24) would be just a few inches too short. I will have to eventually hem these down a bit.  


 I am very happy with the curtains and I think they really bring your eye up. I did not install them yet on the bay window because my dad and I will have to finagle some special way to hang those rods. That will hopefully happen soon, though. 


I got these baskets at Ikea (here) and really like them! I also got the Rens fur rug. Not exactly sure what I will do with it yet but for now it's hanging out in the basket. 

 I am really liking how the dining room is coming together... but it seems a little too "50 shades of grey" for me at the moment. I need a little color in the room and I want to make it a little less formal.
I also got the curtains up in the living room. The furniture in this room sits really low so I am particularly happy to have the curtains to bring your eye up to the ceiling. I feel like my house just got a pretty dress :)

I also have plans for these curtains. I want to do some sort of trim like the ones here: